
Hello everyone, in this tutorial we are going to learn how to make a Music Player App for android (using Android studio). Step by step process is given in this article that will help you to make a simple Music Player App in very easy way.

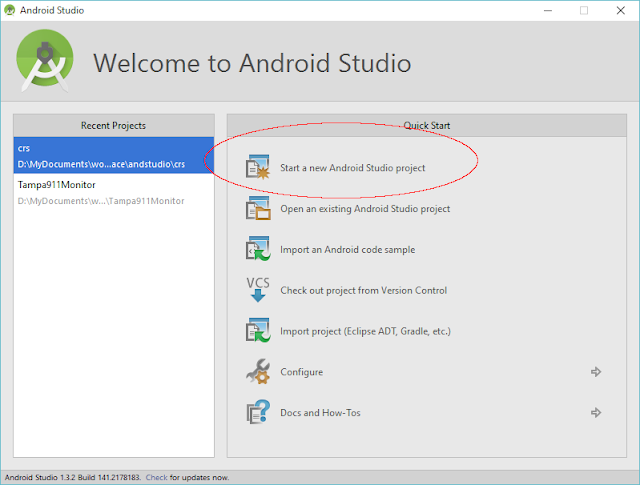
1. First of all open android studio
2. Create a new project > Start a new Android Studio Project > Now name your project “Music Player App”.


Steps to Make a Music Player App for Android
2. Create a new project > Start a new Android Studio Project > Now name your project “Music Player App”.
3. Choose a Package Name. A Package Name is a unique URL of your Application. In most cases it is the inverse of your website. For example: mohit.bhailogprogrammer.com
4. If you want you can leave it to the default package name which is “mohit.musicplayer.com”. Now hit next two times.
4. If you want you can leave it to the default package name which is “mohit.musicplayer.com”. Now hit next two times.
5. If you have made an Icon then add it otherwise go with the default one. Select Empty Activity > Now name your activity
6. Select the from factors and minimum SDK - API15:Android 4.0.3
7. After completing this go to Package Explorer & under your Package Explorer Select src > Your package Name > activity_main.xml

8. Open the activity_main.xml file and paste the given code:
1
2
3
4
5
6
7
8
9
10
11
12
13
14
15
16
17
18
19
20
21
22
23
24
25
26
27
28
29
30
31
32
33
34
35
36
37
38
39
40
41
42
43
44
45
46
47
48
|
<?xml version="1.0" encoding="utf-8"?>
<RelativeLayout xmlns:android="http://schemas.android.com/apk/res/android"
xmlns:app="http://schemas.android.com/apk/res-auto"
xmlns:tools="http://schemas.android.com/tools"
android:layout_width="match_parent"
android:layout_height="match_parent"
android:background="@drawable/background"
tools:context=".MainActivity">
<com.mikhaellopez.circularimageview.CircularImageView
android:layout_width="230dp"
android:layout_height="230dp"
android:layout_alignParentStart="true"
android:layout_alignParentTop="true"
android:layout_marginStart="73dp"
android:layout_marginTop="53dp"
android:src="@drawable/album_art"
app:civ_border_color="#000000" />
<Button
android:id="@+id/btn_play"
android:layout_width="90dp"
android:layout_height="90dp"
android:layout_alignParentBottom="true"
android:layout_centerHorizontal="true"
android:layout_marginBottom="88dp"
android:background="@drawable/play" />
<Button
android:id="@+id/btn_pause"
android:layout_width="80dp"
android:layout_height="80dp"
android:layout_alignBaseline="@+id/btn_play"
android:layout_alignParentStart="true"
android:layout_marginStart="36dp"
android:background="@drawable/pause" />
<Button
android:id="@+id/btn_stop"
android:layout_width="80dp"
android:layout_height="80dp"
android:layout_alignBaseline="@+id/btn_play"
android:layout_alignParentEnd="true"
android:layout_marginEnd="36dp"
android:background="@drawable/stop" />
</RelativeLayout>
|
9. After completing this go to Package Explorer & under your Package Explorer Select src > Your package Name > MainActivity.java
10. Open the MainActivity.java file and paste the given code:
1
2
3
4
5
6
7
8
9
10
11
12
13
14
15
16
17
18
19
20
21
22
23
24
25
26
27
28
29
30
31
32
33
34
35
36
37
38
39
40
41
42
43
44
45
46
47
48
49
50
51
52
53
54
55
56
57
58
59
60
61
62
63
64
65
66
67
68
|
package com.example.mohit.musicplayer;
import android.media.MediaPlayer;
import android.support.v7.app.AppCompatActivity;
import android.os.Bundle;
import android.view.View;
import android.widget.Button;
public class MainActivity extends AppCompatActivity implements View.OnClickListener {
Button play,pause,stop;
MediaPlayer mediaPlayer;
int pausecurrentposition;
@Override
protected void onCreate(Bundle savedInstanceState) {
super.onCreate(savedInstanceState);
setContentView(R.layout.activity_main);
play=(Button) findViewById(R.id.btn_play);
pause=(Button) findViewById(R.id.btn_pause);
stop=(Button) findViewById(R.id.btn_stop);
play.setOnClickListener(this);
pause.setOnClickListener(this);
stop.setOnClickListener(this);
}
@Override
public void onClick(View v) {
switch (View.getId()){
case R.id.btn_play
if(mediaPlayer==null){
mediaPlayer=MediaPlayer.create(getApplicationContext(),R.raw.music);
mediaPlayer.start();}
else if(!mediaPlayer.isPlaying()){
mediaPlayer.seekTo(pausecurrentposition);
mediaPlayer.start();
}
break;
case R.id.btn_pause
if(mediaPlayer!=null){
mediaPlayer.pause();
pausecurrentposition=mediaPlayer.getCurrentPosition()
}
break;
case R.id.btn_stop
if(mediaPlayer!=null) {
mediaPlayer.stop();
mediaPlayer = null;
}
break; } } } |
11.Select build Android Application and build apk
Show your apk

If you liked the tutorial then don’t forget to comment and share!
Show your apk
If you liked the tutorial then don’t forget to comment and share!


0 comments:
Post a Comment